

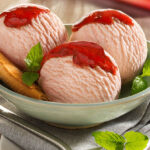
We enjoy both red wine and ice cream. We suggest experimenting with some red wine slushie recipes to get the most out of both, and we are aware that alcoholic ice cream shakes are an excellent way to combine dessert with happy hour. But why not up the ante by preparing your ice cream with the red wine already mixed in? Grab a bottle of your preferred sweet red, and serve it with chocolate or summertime fruits.
Section 1: Full& Professional Recipe
Prep Time:
- About 10 minutes
Heating Time:
- About 35 minutes for the ice cream mix
- About 45 minutes for the red wine
Ingredients:
- Cream
- Full-fat, semi-skimmed, or skimmed milk
- Unrefined sugar
- Skimmed milk powder
- Egg yolks
- 750 ml bottle of red wine
Instructions:
- Check the Milk Fat
Ice cream’s rich, thick, creamy flavor and smooth texture are both greatly influenced by milk fat. Ice cream that is too thin will likely have a heavy buttery texture, while ice cream that is too thick will likely have a gritty or sandy feel. It’s crucial that you examine the milk and cream you’ll be using for fat content percentage.
- Preparing an Ice Bath
Take a big basin and add enough ice to produce an ice bath before you start making your mix. Place some table salt and a sizable zip-lock freezer bag next to the bowl. In order to guarantee that the mixture cools as rapidly as possible after heating, we’ll be utilizing an ice bath and zip-lock bag. By doing this, the mixture spends less time in the “danger zone,” which is the range between 5°C (41°F) and 65°C (149°F), where bacteria like to grow. The longer your mixture stays in this temperature range, the greater the chance that germs will grow and add an unfavorable flavor and odor.
- Heating the Mix
Weigh your pan and make a note of the result. After 25 minutes of heating, we’ll use this weight to determine whether we’ve accomplished the target 15 percent reduction.
Once the ice bath is ready and the pan is weighted, add the sugar, skim milk powder, and egg yolks. To assist prevent the yolks from curdling during cooking, combine the yolks, sugar, and skimmed milk powder. Before turning on the fire, stir the ingredients for about a minute after adding the cream, milk, and sea salt.
Make sure to whisk the mixture regularly as you heat it over medium heat until the temperature reaches 71°C (160°F). If you don’t whisk the mixture constantly, you run the risk of scorching the milk proteins and curdling the egg yolks. My mixture reaches a temperature of 71°C (160°F) in 10 minutes.
Turn the heat down to low after the temperature hits 71°C (160°F), move your pan a little bit away from the heat, and keep heating and stirring until the temperature reaches 72°C (162°F). By altering the location of your pan, you may help maintain the temperature of your mixture at 72°C (162°F) for 25 minutes. Try to keep the temperature as close to 72°C (162°F) as you can, but don’t worry if you go a little above.
- Cooling the Mix
Remove the pan from the heat after 25 minutes of heating at 72°C (162°F) and weigh it. Place the pan back on the heat and continue heating for an additional two to three minutes, or until the weight is reduced to 850g if the weight is greater than 850g plus the weight of the pan.
Pour the mixture into the zip-lock bag with caution, then seal it. To lower the temperature and help the mixture cool more quickly, place the sealed bag in the ice bath along with about a tablespoon of salt.
Place the zip-lock bag in the refrigerator and let the mixture age for one night after it has cooled to below 5°C (41°F).
- Concentrating the Red Wine
To concentrate the flavor, lower the water content, and lower the alcohol content—the latter of which has a considerable impact on freezing point depression and the firmness of your ice cream—we will cut the red wine by 80%.
One bottle of red wine, 750 ml, or 748g, should be added to a big pan. Heat for around 40 minutes at medium heat, or until the red wine has been reduced to 150g plus the weight of your pan. The red wine doesn’t need to be stirred while it’s cooking.
When the red wine has been reduced to 150g, carefully pour it into a glass jug or dish, wrap it in plastic wrap, and let it cool. Place the chilled reduced red wine in the refrigerator after it has reached room temperature.
- Churning the Mix
After letting your red wine and mix-age for the entire night, carefully pour the red wine into your machine.
- Tip#1 – Freezer Bowl Wall Temperature
If your ice cream maker has a built-in compressor, turn it on with the bowl inside the machine and let it run for 15 minutes before adding the ingredients. By doing this, you can make sure the freezer bowl is as cold as possible when you add the mix, which accelerates nucleation and cuts down on residence time.
- Tip#2 – Efficient Heat Transfer
As soon as you pour the mixture into the Cuisinart ICE 30BC, use your thumb to push the dasher against the side of the bowl. This will guarantee that the coating of ice that freezes to the side of the bowl gets scraped off by the dasher. Any ice that has formed on the bowl’s edge will act as insulation, delaying the transfer of heat from the ice cream to the bowl and lengthening the duration that it stays there. According to Goff & Hartel (2013), even a very thin layer of ice left on the bowel wall can significantly reduce heat transfer.
Use a spoon to push along any static lumps of ice cream and ensure that the mix is constantly moving whilst in the machine. Static lumps will likely take longer to freeze, resulting in greater ice crystal growth.
- Draw Temperature
Your ice cream will be done when it starts to take on a lovely, dry, stiff texture and create swirls that resemble ribbons. It should have a drawing temperature of between -9°C and -12°C (15.8°F and 10.4°F), with a lower draw temperature typically producing fewer ice crystals. The draw temperature is the temperature at which the partially frozen ice cream is pulled from the machine.
- Extraction Time
Ice crystal size is significantly influenced by the extraction time, which is the length of time it takes to remove partially frozen ice cream from your machine and place it in the freezer. This is because the ice cream spends some time at room temperature as you remove it from the bowl and place it in a plastic container. Some of the ice from the giant ice crystals melts at this rather warm ambient temperature, while the crystals that were once little crystals totally melt. The melted ice then refreezes onto the big ice crystals that survived when you put your ice cream into your freezer for the static freezing stage. As a result, there are fewer ice crystals overall and they become larger, creating coarse or gritty ice.
- The Static Freezing Stage
Your ice cream will have a consistency very similar to soft serve ice cream at a drawing temperature of between -9°C and -12°C (15.8°F and 10.4°F) and will need to be put in your freezer to firm. Depending on your freezer, your ice cream will be ready to serve in roughly 4 hours with a wonderful, hard consistency that is around -15°C (5°F).
- Serving Your Ice Cream
Serve your ice cream at around -15°C (5°F). As the serving temperature increases from -14.4 (6.1) to -7.8°C (18°F), flavor and sweetness become more pronounced.
Section 2: Quick &Easy Recipe
Ingredients
- 1 bottle of red wine (a Merlot or a soft Shiraz)
- 3/4 cup brown sugar
- 2 cups pouring cream
- 1 vanilla bean
- 4 egg yolks
- 1 cup full cream milk
Equipment
- Ice cream maker.
Instructions:
- In a big pot, pour the entire bottle of red wine. Simmer until there is only 1 cup of liquid left over medium heat.
- Set apart for cooling. In a medium saucepan, stir the brown sugar, cream, and milk together. Slice the vanilla bean in half, remove the seeds with a spoon, and add the halves to the pot.
- Cook while constantly stirring over medium heat until the mixture starts to steam but does not boil.
- Egg yolks should be thick and light in color while being beat in a stand mixer. While continuously whisking the mixture, remove the empty vanilla bean pod from the cream and very slowly pour it into the egg yolks.
- Place the mixture back on the stovetop over medium heat. Up until the mixture becomes thick enough to coat the back of a wooden spoon, stir continuously. Get rid of the heat. After that, pour the mixture into a big bowl. Add the red wine that has been reduced lastly. Before pouring it into your home ice cream maker, chill in the fridge for a few hours or until extremely cool.
- Serve freshly churned red wine ice cream.